FABRICATIONANDREPLACEMENTOFFLEXIBLEHOSE FABRICATION AND REPLACEMENT OF FLEXIBLE HOSE
 
Hose and hose assemblies should be checked for deterioration at each inspection period. Leakage, separation of the cover or braid from the inner tube, cracks, hardening, lack of flexibility, and excessive "cold flow" are apparent signs of deterioration and reason for replacement. The term "cold flow" describes the deep, permanent impressions in the hose produced by the pressure of hose clamps or supports.

When failure occurs in a flexible hose equipped with swaged end fittings, the entire assembly must be replaced. Obtain a new hose assembly of the correct size and length, complete with factory installed end fittings.

When failure occurs in hose equipped with reusable end fittings, a replacement line can be fabricated with the use of such tooling as may be necessary to comply with the assembly instructions of the manufacturer.

Assembly of Sleeve-Type Fittings

Sleeve-type end fittings for flexible hose are detachable and may be reused if determined to be serviceable. The inside diameter of the fitting is the same as the inside diameter of the hose to which it is attached. Common sleeve-type fittings are shown in figure 5-17.

To make a hose assembly, select the proper size hose and end fittings. 
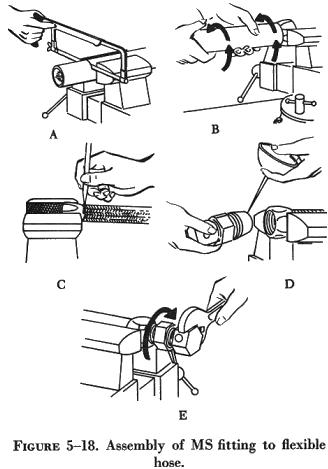
Cut the hose to the correct length using a fine tooth hacksaw. Place the socket in a vise. Screw the hose into the socket counterclockwise until the hose bottoms on the shoulder of the socket (figure 5-18); then back off one-quarter turn. Lubricate inside of hose and nipple threads liberally.

Mark the hose position around the hose at the rear of the socket using 
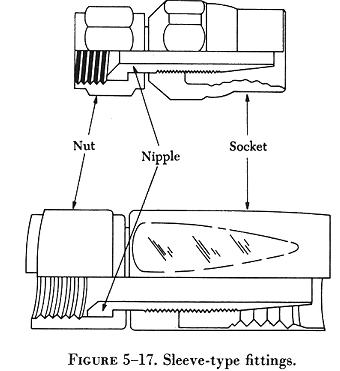
a grease pencil or painted line. Insert the nipple into the nut and tighten the nipple and nut on the assembly tool. If an assembly tool is not available, a mating AN815 adapter may be used. Using a wrench on the assembly tool, screw the nipple into the socket and hose. A 1/32 to 1/16 inch clearance between the nut and sleeve is required so that the nut will swivel freely when the assembly tool is removed. After assembly, always make sure all foreign matter is removed from inside the hose by blowing out with compressed air.

Proof-test After Assembly

All flexible hose must be proof-tested after assembly by plugging or capping one end of the hose and applying pressure to the inside of the hose assembly. The proof-test medium may be a liquid or a gas. For example, hydraulic, fuel, and oil lines are generally tested using hydraulic oil or water, whereas air or instrument lines are tested with dry, oil free air or nitrogen. When testing with a liquid, all trapped air is bled from the assembly prior to tightening the cap or plug. Hose tests, using a gas, are conducted underwater. In all cases follow the hose manufacturer's instructions for proof-test pressure and fluid to be used when testing a specific hose assembly.

Place the hose assembly in a horizontal position and observe for leakage while maintaining the test pressure. Proof-test pressures should be maintained for at least 30 seconds.

Installation of Flexible Hose Assemblies

Flexible hose must not be twisted on installation, since this reduces the life of the hose considerably and may also loosen the fittings. Twisting of the hose can be determined from the identification stripe running along its length. This stripe should not spiral around the hose.

Flexible hose should be protected from chafing by wrapping it with tape, but only where necessary.

The minimum bend radius for flexible hose varies according to size and construction of the hose and the pressure under which the hose is to operate. Bends that are too sharp will reduce the bursting pressure of flexible hose considerably below its rated value (figure 5-19).

Flexible hose should be installed so that it will be subject to a minimum of flexing during operation. Although hose must be supported at least every 24 inches, closer supports are desirable. A flexible hose must never be stretched tightly between two fittings. From 5 percent to 8 percent of its total length must be allowed for freedom of movement under pressure. When under pressure, flexible hose contracts in length and expands in diameter.

Protect all flexible hose from excessive temperatures, either by locating the lines so they will not be affected or by installing shrouds around them.