 |
|
|
|
|||
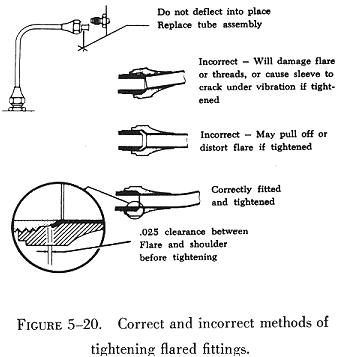
The use of torque wrenches and the prescribed torque values prevents overtightening or undertightening. If a tube fitting assembly is tightened properly, it can be removed and retightened many times before reflaring is necessary. Flareless Tube Installation Tighten the nut by hand until an increase in resistance to turning is encountered. Should it be impossible to run the nut down with the fingers, use a wrench, but be alert for the first signs of bottoming. It is important that the final tightening commence at the point where the nut just begins to bottom. With a wrench, turn the nut 1/6 turn (one flat on a hex nut). Use a wrench on the connector to prevent it from turning while tightening the nut. After the tube assembly is installed, the system should be pressure tested. Should a connection leak, it is permissible to tighten the nut an additional 1/6 turn (making a total of 1/3 turn). If, after tightening the nut a total of 1/3 turn, leakage still exists, the assembly should be removed and the components of the assembly inspected for scores, cracks, presence of foreign material, or damage from overtightening. NOTE: Overtightening a flareless tube nut drives the cutting edge of the sleeve deeply into the tube, causing the tube to be weakened to the point where normal in flight vibration could cause the tube to shear. After inspection (if no discrepancies are found), reassemble the connections and repeat the pressure test procedures. CAUTION: Do not in any case tighten the nut beyond 1/3 turn (two flats on the hex nut); this is the maximum the fitting may be tightened without the possibility of permanently damaging the sleeve and nut. Common faults are: 1. Flare distorted into nut threads.
Some manufacturers service instructions will specify wrench torque values for flareless tubing installations (e.g., see figure 5-22). |
|
|
| ©AvStop Online Magazine Contact Us Return to Airframe & Powerplant General Handbook |