REPAIROFDAMAGEDINTERNALTHREADS
REPAIR OF DAMAGED INTERNAL THREADS
Installation or replacement of bolts is simple when compared to the
installation or replacement of studs. Bolt heads and nuts are cut in the
open, whereas studs are installed into internal threads in a casting or
builtup assembly. Damaged threads on bolts or nuts can be seen and only
require replacement of the defective part. If internal threads are damaged,
two alternatives are apparent: the part may be replaced or the threads
repaired or replaced. Correction of the thread problem is usually cheaper
and more convenient. Two methods of repairing are by replacement bushings
or helicoils.
Replacement Bushings
Bushings are usually special material (steel or brass spark plug bushings
into aluminum cylinder heads). A material that will resist wear is used
where removal and replacement is frequent. The external threads on the
bushing are usually coarse. The bushing is installed, a thread lock compound
may or may not be used, and staked to prevent loosening. Many bushings
have left-hand threads external and right-hand threads internal. With this
installation, removal of the bolt or stud (right-hand threads) tends to
tighten the bushing.
Bushings for common installations such as spark plugs may be up to 0.040
oversize (in increments of 0.005). Original installation and overhaul shop
replacements are shrunk fit: a heated cylinder head and a frozen bushing.
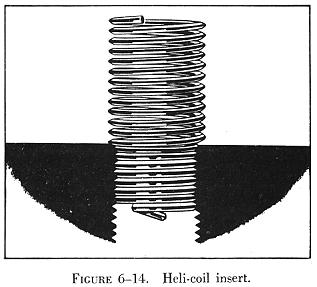 |
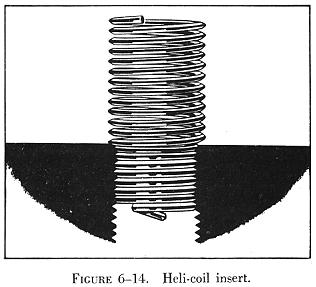
Helicoils
Helicoils are precision formed screw thread coils of 18-8 stainless
steel wire having a diamond shaped cross-section (figure 6-14). They form
unified coarse or unified fine thread classes 2 - band 3B when assembled
into (helicoil) threaded holes. The assembled insert accommodates UNJ (controlled
radius root) male threaded members. Each insert has a driving tang with
a notch to facilitate removal of the tang after the insert is screwed into
a helicoil tapped hole.
They are used as screw thread bushings. In addition to being used to
restore damaged threads, they are used in the original design of missiles,
aircraft engines, and all types of mechanical equipment and accessories
to protect and strengthen tapped threads in light materials, metals, and
plastics, particularly in locations which require frequent assembly and
disassembly, and/or where a screw locking action is desired. |
Helicoil Installation
| Helicoil installation (figure 6-15) is a 5 to 6 step operation,
depending upon how the last step is classed. The following steps are for
instructional purposes only. The manufacturer's instructions should be
followed during installation.
Step 1: Determine what threads are damaged.
Step 2: (a) New installation of helicoil, drill out damaged threads
to minimum depth specified.
(b) Previously installed helicoil. Using proper size extracting tool,
place edge of blade in 90° from the edge of the insert. Tap with hammer
to seat tool. Turn to left, applying pressure, until insert backs out.
Threads are not damaged if insert is properly removed. |
|
Step 3: Tap. Use the tap of required nominal thread size. The tapping
procedure is the same as standard thread tapping. Tap length must be equal
to or exceed the requirement.
Step 4: Gauge. Threads may be checked with a helicoil thread gauge.
Step 5: Insert Assembly. Using proper tool, install insert to a depth
that puts end of top coil 1/4 to 1/2 turn below the top surface of the
tapped hole.
Step 6: Tang breakoff. Select proper breakoff tool. Tangs should be
removed from all drilled through holes. In blind holes the tangs may be
removed when necessary if enough hole depth is provided below the tang
of the installed insert.
These are not to be considered specific instructions on helicoil installation.
The manufacturer's instruction must be followed when making an installation.
Helicoils are available for the following threads: unified coarse, unified
fine, metric, spark plug and national taper pipe threads.