Safetying is the process of securing all aircraft, bolts, nuts, screws, pins, and other fasteners so that they do not work loose due to vibration. A familiarity with the various methods and means of safetying equipment on an aircraft is necessary in order to perform maintenance and inspection.
There are various methods of safetying aircraft parts. The most widely used methods are safety wire, cotter pins, lockwashers, snaprings, and special nuts, such as selflocking nuts, pal nuts, and jamnuts. Some of these nuts and washers have been previously described in this chapter.
Safety Wiring
Safety wiring is the most positive and satisfactory method of safetying capscrews, studs, nuts, bolt heads, and turnbuckle barrels which cannot be safetied by any other practical means. It is a method of wiring together two or more units in such a manner that any tendency of one to loosen is counteracted by the tightening of the wire.
Nuts, Bolts, and Screws
Nuts, bolts, and screws are safety wired by the single wire or double twist method. The double twist method is the most common method of safety wiring. The single wire method may be used on small screws in a closely spaced closed geometrical pattern, on parts in electrical systems, and in places that are extremely difficult to reach.
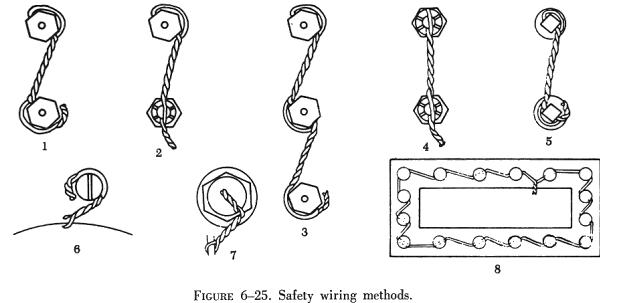
Figure 6-25 is an illustration of various methods which are commonly used in safety wiring nuts, bolts, and screws. Careful study of figure 6-25 shows that:
a. Examples 1, 2, and 5 illustrate the proper method of safety wiring bolts, screws, squarehead plugs, and similar parts when wired in pairs.
b. Example 3 illustrates several components wired in series.
c. Example 4 illustrates the proper method of wiring castellated nuts and studs. (Note that there is no loop around the nut.)
d. Examples 6 and 7 illustrate a single threaded component wired to a housing or lug.
e. Example 8 illustrates several components in a closely spaced closed geometrical pattern, using a single wire method.
When drilled head bolts, screws, or other parts are grouped together, they are more conveniently safety wired to each other in a series rather than individually. The number of nuts, bolts, or screws that may be safety wired together is dependent on the application. For instance, when safety wiring widely spaced bolts by the double twist method, a group of three should be the maximum number in a series.
When safety wiring closely spaced bolts, the number that can be safety wired by a 24 inch length of wire is the maximum in a series. The wire is arranged so that if the bolt or screw begins to loosen, the force applied to the wire is in the tightening direction.
Parts being safety wired should be torqued to recommend values and the holes aligned before attempting the safetying operation. Never over torque or loosen a torqued nut to align safety wire holes.
Oil Caps, Drain Cocks, and Valves
These units are safety wired as shown in figure 6-26. In the case of the oil cap, the wire is anchored to an adjacent fillister head screw.
This system applies to any other unit which must be safety wired individually. Ordinarily, anchorage lips are conveniently located near these individual parts. When such provision is not made, the safety wire is fastened to some adjacent part of the assembly.
Electrical Connectors
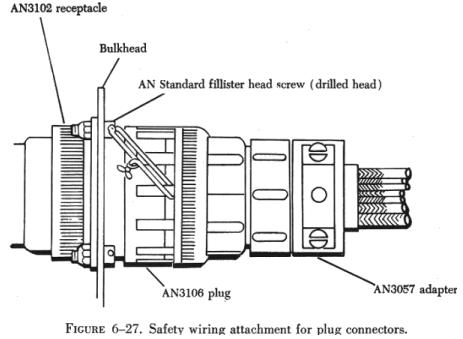
Under conditions of severe vibration, the coupling nut of a connector may vibrate loose, and with sufficient vibration the connector may come apart. When this occurs, the circuit carried by the cable opens. The proper protective measure to prevent this occurrence is by safety wiring as shown in figure 6-27. The safety wire should be as short as practicable and must be installed in such a manner that the pull on the wire is in the direction which tightens the nut on the plug.
After a turnbuckle has been properly adjusted, it must be safetied.
There are several methods of safetying turnbuckles; however, only two methods
will be discussed in this section. These methods are illustrated in figure
6-28(A) and figure 6-28(B).
The clip locking method is used only on the most modern aircraft. The older
type aircraft still use the type turnbuckles that require the wire wrapping
method.
Double Wrap Method
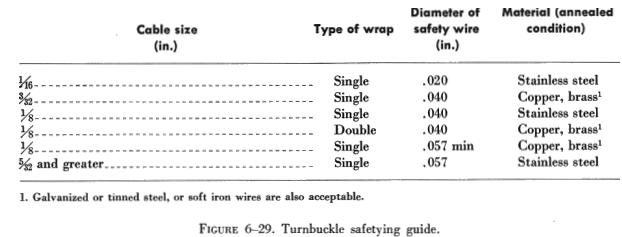
Of the methods using safety wire for safetying turnbuckles, the double wrap method is preferred, although the single wrap, methods described are satisfactory. The method of double wrap safetying is shown in figure 6-28(B). Use two separate lengths of the proper wire as shown in figure 6-29.
Run one end of the wire through the hole in the barrel of the turnbuckle and bend the ends of the wire towards opposite ends of the turnbuckle. Then pass the second length of the wire into the hole in the barrel and bend the ends along the barrel on the side opposite the first. Then pass the wires at the end of the turnbuckle in opposite directions through the holes in the turnbuckle eyes or between the jaws of the turnbuckle fork, as applicable. Bend the laid wires in place before cutting off the wrapped wire. Wrap the remaining length of safety wire at least four turns around the shank and cut it off. Repeat the procedure at the opposite end of the turnbuckle.
When a swaged terminal is being safetied, pass the ends of both wires, if possible, through the hole provided in the terminal for this purpose and wrap both ends around the shank as described above.
If the hole is not large enough to allow passage of both wires, pass the wire through the hole and loop it over the free end of the other wire, and then wrap both ends around the shank as described.
Single Wrap Method
The single wrap safetying methods described in the following paragraphs are acceptable but are not the equal of the double wrap methods.
Pass a single length of wire through the cable eye or fork, or through the hole in the swaged terminal at either end of the turnbuckle assembly. Spiral each of the wire ends in opposite directions around the first half of the turnbuckle barrel so that the wires cross each other twice. Thread both wire ends through the hole in the middle of the barrel so that the third crossing of the wire ends is in the hole. Again, spiral the two wire ends in opposite directions around the remaining half of the turnbuckle, crossing them twice. Then, pass one wire end through the cable eye or fork, or through the hole in the swaged terminal. In the manner described above, wrap both wire ends around the shank for at least four turns each, cutting off the excess wire.
An alternate to the above method is to pass one length of wire through the center hole of the turnbuckle and bend the wire ends toward opposite ends of the turnbuckle. Then pass each wire end through the cable eye or fork, or through the hole in the swaged terminal and wrap each wire end around the shank for at least four turns, cutting off the excess wire. After safetying, no more than three threads of the turnbuckle threaded terminal should be exposed.
General Safety Wiring Rules
When using the safety wire method of safetying, the following general rules should be followed:
1. A pigtail of 1/4 to 1/2 inch (three to six twists) should be made at the end of the wiring. This pigtail must be bent back or under to prevent it from becoming a snag.
2. The safety wire must be new upon each application.
3. When castellated nuts are to be secured with safety wire, tighten the nut to the low side of the selected torque range, unless otherwise specified, and if necessary, continue tightening until a slot aligns with the hole.
4. All safety wires must be tight after installation, but not under such tension that normal handling or vibration will break the wire.
5. The wire must be applied so that all pull exerted by the wire tends to tighten the nut.
6. Twists should be tight and even, and the wire between the nuts as taut as possible without overtwisting.
7. The safety wire should always be installed and twisted so that the loop around the head stays down and does not tend to come up over the bolt head, causing a slack loop.
Cotter Pin Safetying
Cotter pin installation is shown in figure 6-30. Castellated nuts are used with bolts that have been drilled for cotter pins. The cotter pin should fit neatly into the hole, with very little sideplay. The following general rules apply to cotter pin safetying:
1. The prong bent over the bolt end should not extend beyond the bolt diameter. (Cut it off if necessary.)
2. The prong bent down should not rest against the surface of the washer. (Again, cut it off if necessary.)
3. If the optional wraparound method is used, the prongs should not extend outward from the sides of the nut.
4. All prongs should be bent over a reasonable radius. Sharp angled bends invite breakage. Tapping lightly with a mallet is the best method of bending the prongs.
Snaprings
A snapring is a ring of metal, either round or flat in cross section, which is tempered to have springlike action. This springlike action will hold the snapring firmly seated in a groove. The external types are designed to fit in a groove around the outside of a shaft or cylinder. The internal types fit in a groove inside a cylinder. A special type of pliers is designed to install each type of snapring.
Snaprings can be reused as long as they retain their shape and springlike action.

External-type snaprings may be safety wired, but internal types are never safetied. Safety wiring of an external type snapring is shown in figure 6-31.