Sometimes upon encountering adverse weather conditions,
it is advisable for the pilot to use radio navigation aids, or to obtain
directional guidance from ATC facilities. This usually requires that turns
be made and/or specific headings be maintained.
When making turns in adverse weather conditions, there
is nothing to be gained by maneuvering the airplane faster than the pilot's
ability to keep up with the changes that occur in the flight instrument
indications. It is advisable then, to limit all turns to no more than a
standard rate. A standard rate turn is one during which the heading changes
three degrees per second. On most turn indicators this is shown when the
needle is deflected one needle width; on turn coordinators this is shown
when the wing tip of the representative airplane is opposite the standard
rate marker.
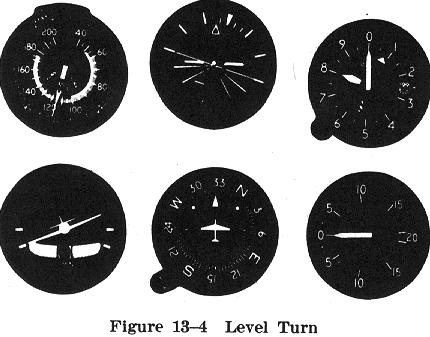
The rate at which a turn should be made is dictated generally by the amount of turn desired - a slow turn for small changes (less than 30 degrees) in heading, a faster turn (up to a standard rate) for larger changes (more than 30 degrees) in heading. The actual rate at which the airplane is being turned can be determined directly by the deflection of the turn indicator needle (or the turn coordinator) and indirectly by the bank angle shown on the attitude indicator (Fig. 13-4).
Before starting the turn to any new heading the pilot should
hold the airplane straight and level and determine in which direction the
turn is to be made. Then, based upon the amount of turn needed to reach
the new heading, the rate or angle of bank should be decided upon. When
using the turn indicator, the needle should be deflected either one-third
or one needle width; when using a turn coordinator the representative airplane's
wings should be banked no more than the standard marker.
When an attitude indicator is available, the pilot should
roll into the turn by using coordinated aileron and rudder pressure in
the direction of the desired turn to establish the desired bank angle.
The amount and direction of the bank will be shown by the angle formed
between the wings of the representative airplane and the line representing
the horizon. If only a turn indicator is available, control pressures should
be applied until the needle is deflected the desired amount; then the bank
angle or turn needle deflection should be maintained until just before
the desired heading is reached. Throughout the turn, the pitch attitude
and altitude must be controlled as previously described.
While making turns for large heading changes, there may be a tendency to gain or lose altitude. If the bank is controlled adequately, the altitude deviation usually will be only slight. The pilot should not be concerned about small deviations - they can be corrected after the rollout. If the bank becomes too steep, however, altitude may be lost rapidly. In this case, the bank should be shallowed rather than adding more back elevator pressure.
As long as the airplane is in a coordinated bank, it continues to turn. Thus, the rollout to a desired heading must be started before the heading is reached. Therefore it is important to refer to the heading indicator to determine the progress being made toward the desired heading, and when the roll out should be started.
At approximately 10 degrees before reaching the desired heading (less lead for small heading changes), coordinated aileron and rudder pressures should be applied to roll the wings level and stop the turn. This is accomplished best by reference to the attitude indicator. If only a turn indicator or turn coordinator is available, the needle should be centered or the representative wings leveled as appropriate. Failure to roll out exactly on the desired heading should cause no great alarm - final corrections can be made after the airplane is in straight and level flight and the pilot is assured of having positive control. Remember, the airplane's nose will tend to rise as the wings are being returned to the level attitude. Sufficient forward elevator pressure must be applied to maintain a constant altitude.
Once again, the pilot is cautioned against "chasing" the
pointers on the instruments. The pointers should be allowed to settle down
and then adjustments made as needed.