Standard Rate Turns.
To enter a standard-rate level turn, apply coordinated aileron and rudder pressures in the desired direction of turn. Students commonly roll into turns at a much too rapid rate. During initial training in turns, base your control pressures on your rate of cross-check and interpretation. There is nothing to be gained by maneuvering an airplane faster than your capacity to keep up with the changes in instrument indications.
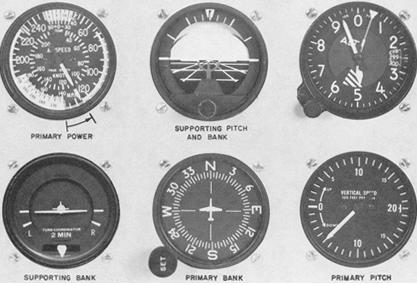
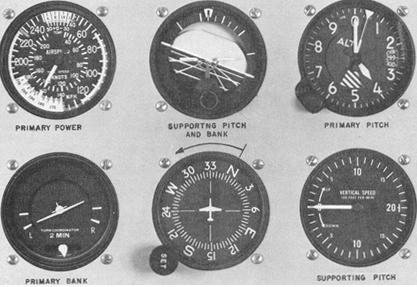
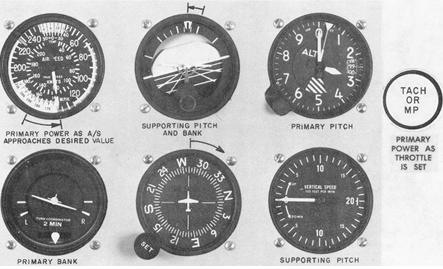
On the roll-in, use the attitude indicator to establish the approximate angle of bank, then check the miniature aircraft of the turn coordinator for a standard-rate turn indication. Maintain the bank for this rate of turn, using the miniature aircraft of the turn coordinator as the primary bank reference and the attitude indicator as the supporting bank instrument (Fig. 5-35). Note the exact angle of bank shown on the banking scale of the attitude indicator when the turn coordinator indicates a standard rate turn.
During the roll-in, check the altimeter, vertical speed indicator, and attitude indicator for the pitch adjustments necessary as the vertical lift component decreases with increase in bank. If constant airspeed is to be maintained, the airspeed indicator becomes primary for power, and the throttle must be adjusted as drag increases. As the bank is established, trim off the pressures applied during pitch and power changes.
To recover to straight-and-level flight, apply coordinated aileron and rudder pressures opposite the direction of turn. If you strive for the same rate of roll-out that you use to roll into the turn, you will encounter fewer problems in judging the lead necessary to roll out on exact headings, especially on partial panel maneuvers. As you initiate the turn recovery, the attitude indicator becomes the primary bank instrument. When the airplane is approximately level, the heading indicator is the primary bank instrument as in straight-and-level flight. Pitch, power, and trim adjustments are made as changes in vertical lift component and airspeed occur. The ball should be checked throughout the turn, especially if control pressures are held instead of being trimmed off.
Some airplanes are very stable during turns, and slight trim adjustments permit "hands off" flight while the airplane remains in the established attitude. Other airplanes require constant rapid cross-check and control during turns to correct over-banking tendencies. Due to the interrelationship of pitch, bank, and airspeed deviations during turns, your cross-check must be fast to prevent an accumulation of errors.
Figure 5-32. Constant rate descent, airspeed high - reduce power.
|
Figure 5-33. Level-off airspeed higher than descent airspeed.
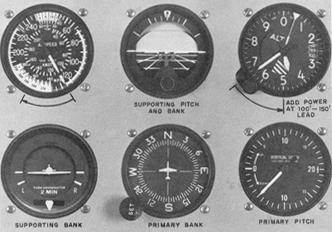 |
Figure 5-34. Level-off at descent airspeed.
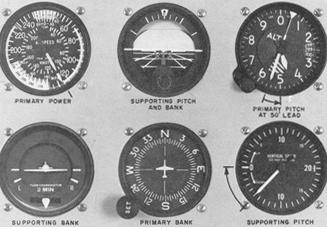 |
Figure 5-35. Standard rate turn, constant airspeed.
 |
Turns to Predetermined Headings. As long as an airplane is in a coordinated bank, it continues to turn. Thus, the roll-out to a desired heading must be started before the heading is reached. The amount of lead varies with the relationship between the rate of turn, angle of bank, and rate of recovery. For small changes in heading, using an angle of bank not exceeding the number of degrees to be turned, lead the desired heading by one-half the number of degrees of bank used. For example, if you maintain a 10° bank during a change in heading, start the roll-out 5° before reaching the desired heading. For larger changes in heading, the amount of lead will vary since the angle of bank for a standard-rate turn varies with the True Airspeed. Practice with a lead of one-half the angle of bank until you have determined the precise lead suitable to your technique. If your rates of roll-in and roll-out are consistent, you can readily determine the precise amount of lead suitable to your particular rollout technique by noting the amount that you consistently undershoot or overshoot the headings.
Timed Turns.
A timed turn is a turn in which the clock and the turn coordinator are used to change heading a definite number of degrees in a given time. For example, using a standard rate turn (3° per second), an airplane turns 45° in 15 seconds; using a half-standard-rate turn, the airplane turns 45° in 30 seconds.
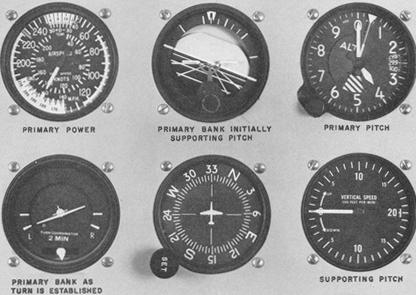
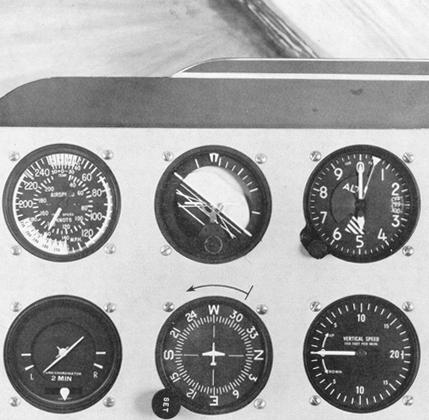
Prior to performing timed turns, the turn coordinator should be calibrated to determine the accuracy of its indications (Fig. 5-36). Establish a standard rate turn as indicated by the turn coordinator and as the sweep second hand of the clock passes a cardinal point (12, 3, 6, 9), check the heading on the heading indicator. While holding the indicated rate of turn constant, note the indicated heading changes at 10-second intervals. If the airplane turns more or less than 30° in that interval, a larger or smaller deflection of the miniature aircraft of the turn coordinator is necessary to produce a standard-rate turn. When you have calibrated the turn coordinator during turns in each direction, note the corrected deflections, if any, and apply them during all timed turns.
You use the same cross check and control technique in making timed turns that you use to execute turns to predetermined headings, except that you substitute the clock for the heading indicator. The miniature aircraft of the turn coordinator is primary for bank control, the altimeter is primary for pitch control, and the airspeed indicator is primary for power control. Start the roll-in when the clock second hand passes a cardinal point, hold the turn at the calibrated standard-rate indication (or half-standard-rate for small changes in heading), and begin the roll-out when the computed number of seconds has elapsed. If the rates of roll-in and rollout are the same, the time taken during entry and recovery need not be considered in the time computation.
Figure 5-36. Turn coordinator calibration.
 |
Note: The arrow above the heading indicator in Fig. 5-36 and the following instrument panel illustrations portrays the apparent movement of the miniature aircraft relative to the compass card.
If you practice timed turns with a full instrument panel, check the heading indicator for the accuracy of your turns. If you execute the turns without the gyro heading indicator, use the magnetic compass at the completion of the turn to check turn accuracy, taking compass deviation errors into consideration.
Compass Turns.
In most light airplanes, the magnetic compass is the only direction-indicating instrument independent of other airplane instruments and power sources. Because of its operating characteristics, called compass errors, pilots are prone to use it only as a reference for setting the heading indicator, but a knowledge of magnetic compass characteristics will enable you to use the instrument to turn your airplane to correct headings and maintain them. The construction and operation of the magnetic compass was discussed in Chapter IV. This information should be thoroughly understood before practicing compass turns.
Bear in mind the following points when making turns to magnetic compass headings or when using the magnetic compass as a reference for setting the heading indicator:
1. If you are on a northerly heading and you start a turn to
the east or west, the indication of the compass lags, or shows a turn in
the opposite direction.
2. If you are on a southerly heading and you start a turn toward
the east or west, the compass indication precedes the turn, showing a greater
amount of turn than is actually occurring.
3. When you are on an east or west heading, the compass indicates
correctly as you start a turn in either direction.
4. If you are on an easterly or westerly heading, acceleration
results in a northerly turn indication; deceleration results in a southerly
turn indication.
5. If you maintain a north or south heading, no error results
from diving, climbing, or changing airspeed.
With an angle of bank between 15° and 18°, the amount
of lead or lag to be used when turning to northerly or southerly headings
varies with, and is approximately equal to, the latitude of the locality
over which the turn is being made. When turning to a heading of north,
the lead for roll-out must include the number of degrees of your latitude,
plus the lead you normally use in recovery from turns. During a turn to
a south heading, maintain the turn until the compass passes south the number
of degrees of your latitude, minus your normal rollout lead (Fig. 5-37).
Figure 5-37. Northerly and southerly turn error.
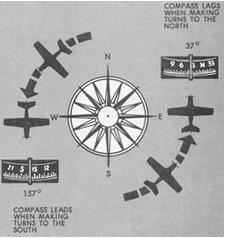 |
For example, when turning from an easterly direction to north, where the latitude is 30°, start the roll-out when the compass reads 37°, (30° plus one-half the 15° angle of bank, or whatever amount is appropriate for your rate of roll-out). When turning from an easterly direction to south, start the roll-out when the magnetic compass reads 203° (180° plus 30° minus one-half the angle of bank). When making similar turns from a westerly direction, the appropriate points at which to begin your roll-out would be 323° for a turn to north, and 157° for a turn to south.
When turning to a heading of east or west from a northerly direction, start the roll-out approximately 10° to 12° before the east or west indication is reached. When turning to an east or west heading from a southerly direction, start the roll-out approximately 5° before the east or west indication is reached. When turning to other headings, the lead or lag must be interpolated.
Abrupt changes in attitude or airspeed and the resulting erratic movements of the compass card make accurate interpretations of the instrument very difficult. Proficiency in compass turns depends on knowledge of the compass characteristics, smooth control technique, and accurate bank and pitch control.
Steep Turns.
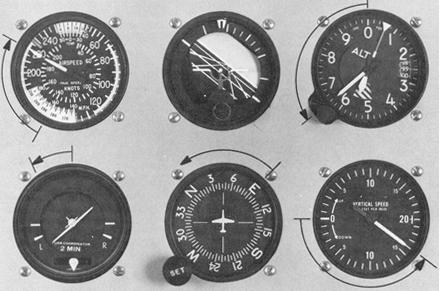
For purposes of instrument flight training in conventional airplanes, any turn greater than a standard-rate may be considered steep (Fig. 5-38). The exact angle of bank at which a normal turn becomes steep is unimportant. What is important is that you learn to control the airplane with bank attitudes in excess of those you normally use on instruments. Practice in steep turns will not only increase your proficiency in the basic instrument flying skills, but also enable you to react smoothly, quickly, and confidently to unexpected abnormal flight attitudes under instrument flight conditions.
Pronounced changes occur in the effects of aerodynamic forces on aircraft control at progressively steepening bank attitudes. Skill in cross-check, interpretation, and control is increasingly necessary in proportion to the amount of these changes, though the techniques for entering, maintaining, and recovering from the turn are the same in principle for steep turns as for shallower turns.
Enter a steep turn exactly as you do a shallower turn, but prepare to cross-check rapidly as the turn steepens. Because of the greatly reduced vertical lift component, pitch control is usually the most difficult aspect of this maneuver. Unless immediately noted and corrected with a pitch increase, the loss of vertical lift results in rapid movement of the altimeter, vertical-speed, and airspeed needles. The faster the rate of bank change, the more suddenly the lift changes occur. If your cross-check is fast enough to note the immediate need for pitch changes, smooth, steady back elevator pressure will maintain constant altitude. However, if you over-bank to excessively steep angles without adjusting pitch as the bank changes occur, pitch corrections require increasingly stronger elevator pressure. The loss of vertical lift and increase in wing loading finally reach a point where further application of back elevator pressure tightens the turn without raising the nose. (The effect of abrupt elevator control on wing loading and its effect on airplane stalling speeds during steep turns was discussed in Chapter III.)
Figure 5-38. Steep left turn.
 |
How do you recognize overbanking and a low pitch attitude? What should you do to correct it? If you observe a rapid downward movement of the altimeter needle or vertical-speed needle, together with an increase in airspeed, despite your application of back elevator pressure, you are in a diving spiral (Fig. 5-39). Immediately shallow the bank with smooth and coordinated aileron and rudder pressures, hold or slightly relax elevator pressure, and increase your cross-check of attitude indicator, altimeter, and vertical-speed indicator. Reduce power if the airspeed increase is rapid. When the vertical speed trends upward, the altimeter needle will move slower as the vertical lift increases. When you note that the elevator is effective in raising the nose, hold the bank attitude shown on the attitude indicator and adjust elevator control pressures smoothly for the nose-high attitude appropriate to the bank maintained. If your pitch control is consistently late on your entries to steep turns, roll out immediately to straight-and-level flight and analyze your errors. Practice shallower turns until you can keep up with the attitude changes and control responses required, then steepen the banks as you develop quicker and more accurate control technique.
The power necessary to maintain constant airspeed increases as the bank and drag increase. With practice, you quickly learn the power settings appropriate to specific bank attitudes, and can make adjustments without undue attention to airspeed and power instruments. During training in steep turns, as in any other maneuver, attend to "first things first." If you keep pitch relatively constant, you have more time to cross-check, interpret, and control for accurate airspeed and bank control.
Figure 5-39. Diving spiral.
 |
During recovery from steep turns to straight-and-level flight, elevator and power control must be coordinated with bank control in proportion to the changes in aerodynamic forces. Back elevator pressures must be released, and power decreased. The common errors associated with steep turns are the same as those discussed later in is section; however, remember, errors are more exaggerated, more difficult to correct, and more difficult to analyze unless your rates of entry and recovery are consistent with your level of proficiency in the three basic instrument flying skills.
Climbing and Descending Turns.
To execute climbing and descending turns, combine the technique used in straight climbs and descents with the various turn techniques. The aerodynamic factors affecting lift and power control must be considered in determining power settings, and the rate of cross-check and interpretation must be increased to enable you to control bank as well as pitch changes.
Change of Airspeed in Turns.
Changing airspeed in turns is an effective maneuver for increasing your proficiency in all three basic instrument skills. Since the maneuver involves simultaneous changes in all components of control, proper execution requires rapid cross-check and interpretation as well as smooth control. Proficiency in the maneuver will also contribute to your confidence in the instruments during attitude and power changes involved in more complex maneuvers. Pitch and power control techniques are the same as those used during changes in airspeed in straight-and-level flight.
As discussed in Chapter III, the angle of bank necessary for a given rate of turn is proportional to the true airspeed. Since the turns are executed at standard-rate, the angle of bank must be varied in direct proportion to the airspeed change in order to maintain a constant rate of turn. During a reduction of airspeed, you must decrease the angle of bank and increase the pitch attitude to maintain altitude and a standard rate turn.
The altimeter and turn coordinator indications should remain constant throughout the turn. The altimeter is primary for pitch control and the miniature aircraft of the turn coordinator is primary for bank control. The manifold pressure gauge (or tachometer) is primary for power control while the airspeed is changing. As the airspeed approaches the new indication, the airspeed indicator becomes primary for power control.
Two methods of changing airspeed in turns may be used. In the first method, airspeed is changed after the turn is established (Fig. 5-40); in the second method, the airspeed change is initiated simultaneously with the turn entry. The first method is easier, but regardless of the method used, the rate of cross-check must be increased as you reduce power. As the airplane decelerates, check the altimeter and vertical-speed indicator for needed pitch changes and the bank instruments for needed bank changes. If the miniature aircraft of the turn coordinator shows a deviation from the desired deflection, change the bank. Adjust pitch attitude to maintain altitude. When the airspeed approaches that desired, it becomes primary for power control and the manifold pressure gauge (or tachometer) is adjusted to maintain the desired airspeed. Trim is important throughout the maneuver to relieve control pressures.
Figure 5-40. Change of airspeed in turn.
 |
Until your control technique is very smooth, frequent cross-check of the attitude indicator is essential to keep from overcontrolling and to provide approximate bank angles appropriate to the changing airspeeds.
Common Errors During Turns.
Pitch errors result from the following faults:
1. Preoccupation with bank control during turn entry and recovery.
If it takes 5 seconds to roll into a turn, check the pitch instruments
as you initiate bank pressures. If your bank control pressure and rate
of bank change are consistent, you will soon develop a sense of timing
that tells you how long an attitude change will take. During the interval,
you check pitch, power, and trim - as well as bank - controlling the total
attitude instead of one factor at a time.
2. Failure to understand or remember the necessity for changing
the pitch attitude as the vertical lift component changes, resulting in
consistent loss of altitude during entries.
3. Changing the pitch attitude before it is necessary. This fault
is very likely if your cross-check is slow and your rate of entry too rapid.
The error occurs during the turn entry due to a mechanical and premature
application of back elevator control pressure.
4. Overcontrolling the pitch changes. This fault is commonly
applied to the previous one.
5. Failure to properly adjust the pitch attitude as the vertical
lift component increases during the roll-out, resulting in consistent gain
in altitude on recovery to headings.
6. Failure to trim during turn entry and following turn recovery
(if turn is prolonged).
7. Failure to maintain straight-and-level cross-check after roll-out.
This error commonly follows a perfectly executed turn.
8. Erratic rates of bank change on entry and recovery, resulting
in failure to cross-check the pitch instruments with a consistent technique
appropriate to the changes in lift.
Bank and heading errors result from the following faults:
1. Overcontrolling, resulting in overbanking on turn entry, overshooting
and undershooting headings, as well as aggravated pitch, airspeed, and
trim errors.
2. Fixation on a single bank instrument. On a 90° change
of heading, for example, leave the heading indicator out of your cross-check
for approximately 20 seconds after establishing a standard-rate turn, since
at 3° per second you won't approach the lead point until that time
has elapsed. Make your cross-check selective; check what needs to be checked
at the appropriate time.
3. Failure to check for precession of the horizon bar following
recovery from a turn. If the heading indicator shows a change in heading
when the attitude indicator shows level flight, the airplane is turning.
If the ball is centered, the attitude gyro has precessed; if the ball is
not centered, the airplane may be in a slipping or skidding turn. Center
the ball with rudder pressure, check the attitude indicator and heading
indicator, stop the heading change if it continues, and retrim.
4. Failure to use the proper degree of bank for the amount of
heading change desired. Rolling into a 20° bank for a heading change
of 10° will normally overshoot the heading. Use the bank attitude appropriate
to the amount of heading change desired.
5. Failure to remember the heading you are turning to. This fault
is likely when you rush the maneuver.
6. Turning in the wrong direction, due either to misreading or
misinterpretation of the heading indicator or to confusion as to location
of points on the compass. Turn in the shortest direction to reach a given
heading, unless you have a specific reason to turn the long way around.
Study the compass rose until you can visualize at least the positions of
the eight major points around the azimuth. A number of memory "gimmicks"
can be used to make quick computations for heading changes. For example,
to turn from a heading of 305°, to a heading of 110°, do you turn
right or left for the shortest way around? Subtracting 200 from 305 and
adding 20, you get 125° as the reciprocal of 305°; therefore, execute
the turn to the right. Likewise, to figure the reciprocal of a heading
less than 180°, add 200 and subtract 20. If you can compute more quickly
using multiples of 100's and 10's than by adding or subtracting 180°
from the actual heading, the method suggested above may save you time and
confusion.
7. Failure to check the ball of the turn coordinator when interpreting
that instrument for bank information. If the roll rate is reduced to zero,
the miniature aircraft of the turn coordinator indicates only direction
and rate of turn. Unless the ball is centered, you cannot assume that the
turn is resulting from a banked attitude.
Power and airspeed errors result from the following faults:
1. Failure to cross-check the airspeed indicator as you make pitch
changes.
2. Erratic use of power control. This may be due to improper
throttle friction control, to inaccurate throttle settings, chasing the
airspeed readings, abrupt or overcontrolled pitch add bank changes, or
failure to recheck the airspeed to note the effect of a power adjustment.
3. Poor coordination of throttle control with pitch and bank
changes, associated with slow cross-check or failure to understand the
aerodynamic factors related to turns.
Trim errors result from the following faults:
1. Failure to recognize the need for a trim change may be due
to slow cross-check and interpretation. For example, a turn entry at a
rate too rapid for your cross-check leads to confusion in cross-check and
interpretation, with resulting tension on the controls.
2. Failure to understand the relationship between trim and attitude/power
changes.
3. Chasing the vertical-speed needle. Overcontrolling leads to
tension and prevents you from sensing the pressures to be trimmed off.
4. Failure to trim following power changes.
Errors During Compass Turns.
In addition to the faults discussed above, the following errors
connected with compass turns should be noted:
1. Faulty understanding or computation of lead and lag.
2. Fixation on the compass during the rollout. Until the airplane
is in straight-and-level, unaccelerated flight, there is no point in reading
the indicated heading. Accordingly, after you initiate the roll-out, cross-check
for straight-and-level flight before checking the accuracy of your turn.