|
Chapter 5 — Preflight and Ground Operations
Wing Inspection
The powered parachute flight instructor will spend a
great deal of time explaining the systems of the wing,
the proper preflight, and the different methods of staging
the wing for inflation by means of different layout
techniques. The wing, and its performance, is critical
to flight and safety; once again a thorough and systematic
preflight procedure is essential.
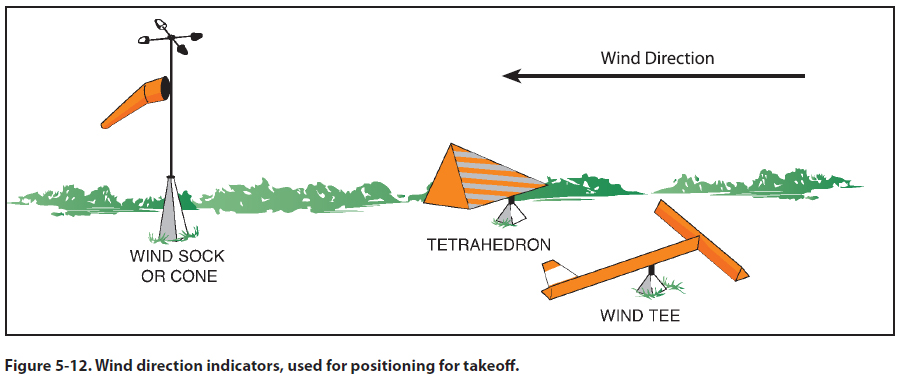
Check the wind direction and manually point the cart
directly into the wind. Many PPC pilots use a telescoping
rod with a windsock or long strip of narrow
rip-stop suspended from the top, displayed from their
powered parachute trailer or vehicle to determine wind
direction and wind speed. Some pilots prefer handheld
wind speed/direction devices. Most conventional
airports have some sort of wind indicator (windsock,
wind T, etc.) positioned in the segmented circle, as
well as electronic weather indicators that accurately
measure wind speed and direction at the field. Once
the powered parachute engine starts it will be nearly
impossible for the pilot to determine the direction of
the wind without the aid of a wind direction indicator.
[Figure 5-12]
Remove the wing bag from its stored position on the
airframe, either on the rear or pilot’s seat, or hanging
from the airframe itself. It is critical that the bag not
be twisted, rotated or turned when removing it from
its storage location, as doing so will twist and entangle
the suspension lines. Another determining factor
in keeping the suspension lines free from is how you
packed the wing away the last time it was flown; the
proper procedure for re-bagging the PPC wing will be
covered at the end of this chapter.
It is critical for the powered parachute pilot to be able
to recognize when the suspension lines are twisted
and to know how to untwist them. Most wing bags
are clearly marked with an emblem or other marking
to identify one side of the bag from the other. Keeping
the marked side of the wing bag always facing
in the same direction (either facing the cart or facing
away from the cart) is a helpful reference to determine
if you have twisted the suspension lines while
moving the wing into place, either on or behind the
cart. The key is to be consistent and methodical in
whatever procedure you use. Your flight instructor
will offer input on a practical procedure. The height
and physical strength of the pilot will also be a factor
in determining the best position on the cart to store
the wing bag.
Place the wing bag on the ground directly behind the
airframe as far back as the riser and support lines will
allow, keeping the wing bag in the same configuration
that it was removed from the cart. You will have to pull
both line sleeves that hold the suspension lines out of the wing bag, and one line sleeve up and around the
cart to follow the bag; those lines should run straight
from the attach points on the cart to the wing bag after
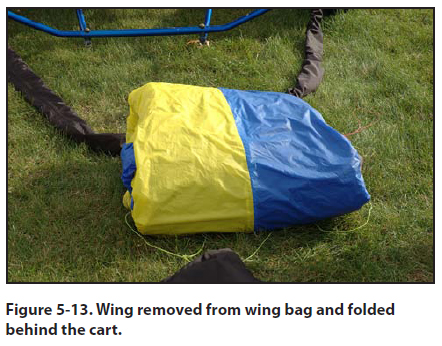
the bag is in position behind the cart. Tilt the wing bag
toward the cart to spill the folded wing out of the bag
and onto the ground. [Figure 5-13]
With the wing folded behind the cart, you are ready
to spread it out and in doing so begin to visually inspect
the uninflated wing. Unfold the right side of the
wing toward the right and repeat on the left side. As
you unfold the wing, it should remain centered directly
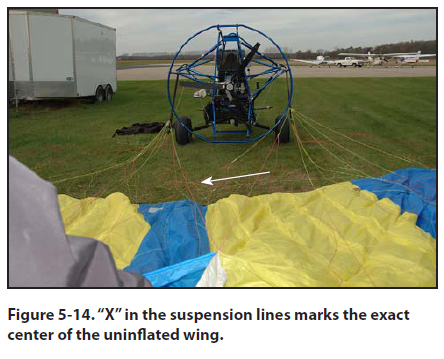
behind the cart. After the wing is completely
unfolded, stand directly behind the cart and hold the
leading edge of the wing up in front of you as you
face the backside of the cart. You will see an “x” in the
lines; this “x” should be positioned directly behind
the centerline of the prop on the cart. [Figure 5-14] If
it is not, physically pick up the center and drag it into
the center position. Then go to the end of the side that
will be bunched up and pull out the slack.
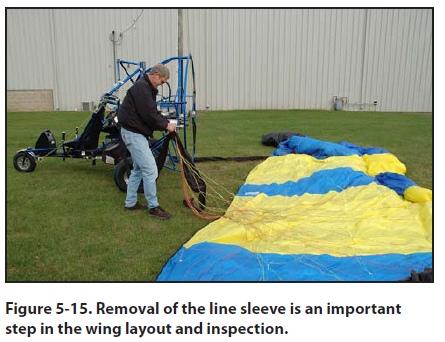
Remove the protective sleeves that cover the suspension
lines and their components. The protective
sleeves are referred to as line sleeves and there is a
line sleeve on each set of lines (or two—
the right and
the left). [Figure 5-15]
While laying out the wing, check for tears in the fabric,
torn or loose stitching, abrasions, and deterioration
of the fabric from ultraviolet rays. The sun is one
of the powered parachute wing’s worst enemies, next
to the prop! Certain colors deteriorate faster than others,
like red and orange, when exposed to ultraviolet
rays from the sun. When the wing is not being used,
you should always return it to its wing bag. Take this
opportunity to check the wing cells for debris, such as
stones, sticks, and bugs; lifting the wing by the trailing
edge and gently shaking it will allow most captured
debris to fall out of the ram-air openings on the
leading edge of the wing.
With the wing centered behind the cart, it is time to
start checking the suspension lines. At first glance
it may look difficult to sort out all of the lines from
the cart to the wing. Most of the time, the lines will
straighten out with just a light flick of the wrist. Make
sure you have no twists or line-overs and your lines
are straight. As long as the wing has not been physically
removed, or disconnected from the cart, there
should not be any permanent knots in the lines. In
the event that you detect pressure knots during the
line inspection they are easily removed with minimal
manipulation.
Small twigs, stems from weeds, and other debris can
get caught in the lines to form pressure knots. Pressure
knots are a concern because they are only “knots”
when there is tension on the lines. That means they are
only a problem when your wing is inflated. As soon
as you land, the foreign object often shakes free and
there is no knot. However, while you are flying, that pressure knot can cause the powered parachute to go
into a steep turn. Make sure there is nothing around to
catch into your line sets. The more organized the suspension
lines are laid out during this preflight check,
the more likely that the wing will kite evenly and
without mishap. It may take a great deal of space to
get all the cells open during the inflation of the wing.
Aborting the takeoff to re-kite the wing is always an
option, but it is not desirable. Preflight the wing correctly
the first time.
If you put your wing away correctly and took it out
as described, it should not have any twists in it. However,
you still need to check. Start where the risers attach
to the cart. Make sure they are not twisted around
anything and trace each one back to the point where
the wing risers are attached to the cart.
Check the steering lines on both sides of the cart;
make sure the anchor point knots are secure and the
lines flow freely through all guides and pulleys. Make
sure the links on both sides of the aircraft are secure;
it is recommended that the links are finger tight plus
one-quarter turn. Continue by checking that the riser
cables are not twisted or damaged and they are free
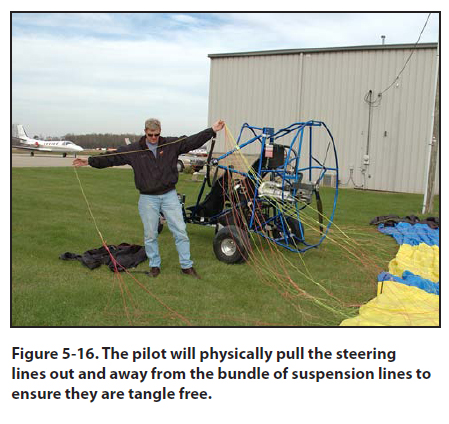
from tangles. At this time pull slack from the steering
lines so the steering bars are fully retracted. Physically
separating the steering lines from the suspension
lines, pulling them out and away to the outer edge of
the wingtips, enables you to visually see the steering
lines are free from being tangled with the rest of the
lines. [Figure 5-16]
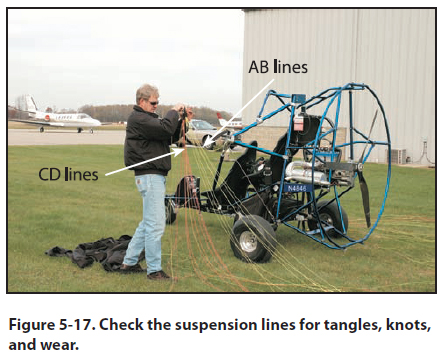
Continue to check the suspension lines for tangles,
knots and wear and the attachment points for security
and lack of fraying. [Figure 5-17] The A lines should
be visually and physically separated from the B lines
at the point where the lines are connected to the risers.
Most newer wing lines are color-coded to make
this process visually easier; the older wing styles will
still be separated and configured the same way as the
newer wings, however all the lines will be the same
color. The A lines will travel toward the leading edge
of the wing and subdivide into the C lines. The B lines
will travel toward the trailing edge of the wing and
subdivide into the D lines. Make sure that the lines
are all separated and not tangled. The A/C lines will
be on top of the B/D lines when the lines are returned
to the ground after the preflight of each section. Make
sure there is no debris around to catch in the line sets
during wing inflation; when the length of the line is
altered it changes how the line holds the wing. The
length of the lines are clearly defined by the manufacturers
and should not be changed. The more organized the suspension lines are laid out during this preflight
check, the more likely that the wing will kite evenly
and without mishap; a lot of runway can be used up
trying to get all the cells open during inflation of the
wing. Aborting the takeoff to re-kite the wing is always
an option, but it is not desirable. Preflight the
wing correctly the first time; taking your time will pay
off in the end.
|

