Chapter 5
CONTAINER
1. As stated in the beginning of this chapter, the initial
external inspection of the container should alert the rigger
to any damage inside. Note any holes, abrasion, or fraying
of the pack material.
2. Check the grommets for sharp edges and pulling out of
the material from under the grommet. Cones should have
the stitching secure. Check the plating on the cones in the
area of the eye. Sharp edges can cause a cone lock.
Eyelets should have the tacking secure. Snap fasteners
should be securely set in the material. Check for wear and
security of the opposing parts. Make sure that “pull-thedot”
types are set correctly for direction. Stiffeners, both
metal and plastic, should not be bent or cracked. There
should be no sharp edges. Pack opening bands (POBs),
if used, should be in good shape and not stretched out.
Make sure the hooks are in good shape, too. On the military
style POBs, it may be necessary to retack the pull tabs at the end. Metal frames, if used, should be straight. Buffers
at the corners should be in good condition. Tackings, if
used, should be secure.
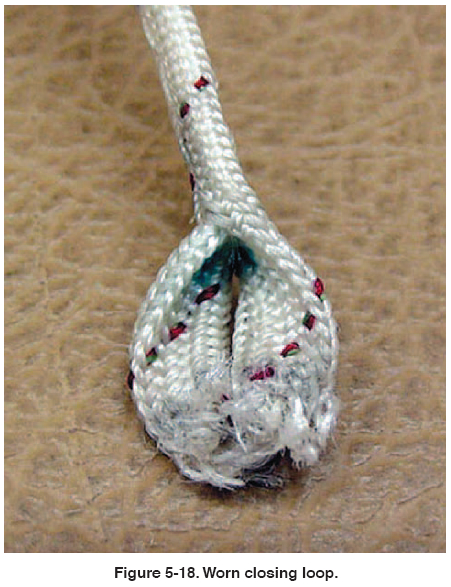
3. The container-closing loop is an extremely important
part of the container system. A worn loop may fail, which
would cause a premature opening of the container. With
the parachute still in a packed condition, check for the
correct length. If the loop is made too long or stretched
during use, the pilot chute can extend and move off center.
This may result in a poor launch or a pack job that is
uncomfortable for the user. After determining that the
loop is of the correct material and length, check the
eye(s) of the loop on the inside for wear. It is not
uncommon for the loop to appear to be in good condition
when viewed from the outside, but worn partially
through when examined from the inside. [Figure 5-18]
Many riggers simply replace the loops at each repack,
regardless of the condition.

RIPCORD
There are a number of things that need to be inspected
to approve the ripcord:
1. Check the pin(s) for straightness, smoothness,
cracks or other damage.
2. Check the cable for fraying, kinks, or severe bends.
3. Check the swage for wear and security. Look for
signs of movement on the cable.
4. Check the handle for wear, damage, rust or abuse.
Any damage or discrepancies found during the inspection
should be noted and the appropriate repair performed by
a certificated and appropriately rated rigger according to
the manufacturer’s instructions or approved manuals.
| 
