Chapter 5
CONTAINER
In addition to those container areas referenced under the
pilot emergency system, the sport piggyback container
has features unique to this configuration.
1. Check the installation of the AAD, if one is installed,
making sure the stowage pockets, cutter mounts, and control
unit are secure. Check that the cables are routed correctly.
If they are exposed, they may get snagged during
packing and damaged or disconnected. Upon completion,
inspect the condition of the closing loop.
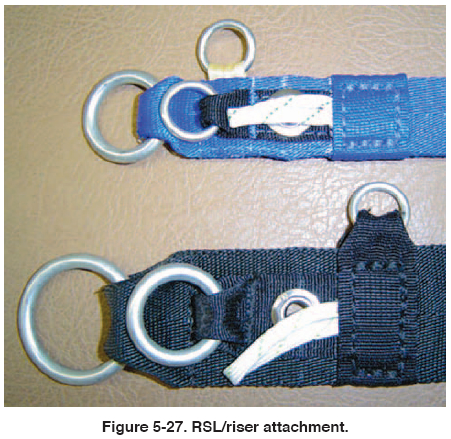
2. Check the Reserve Static Line (RSL). The RSL is not
considered part of the certified reserve system, but if it is
installed, the rigger is responsible for the entire RSL
assembly since it is attached to the ripcord handle, cable,
or housing. This includes the cable housings for tacking
and security, any guide rings used, and the RSL lanyard
itself. Check the release or snap shackle, if used, and any
Velcro® or other positioning or locating methods. An area
frequently overlooked is the RSL attachment ring on the
main risers, which are frequently replaced. [Figure 5-27]
In many cases, the attachment ring does not match up to
the original design. The rigger should inspect the release
handle for proper cable lengths. If the design has only one
riser attached to the RSL, it is imperative that the cables
be trimmed to release the side opposite the lanyard first
so that the reserve is not deployed before the risers are
separated from the harness.
3. Check the main deployment system, of which there are
three basic types in use today. The first is a ripcord similar
to the pilot emergency system. The second type is the
throw-out pilot chute (TOP). The third is the pull-out pilot
chute (POP).
Next, inspect the main ripcord system. Check the ripcord
and main pilot chute the same as with the pilot
emergency system. Inspect the ripcord pocket for
proper holding of the ripcord handle.
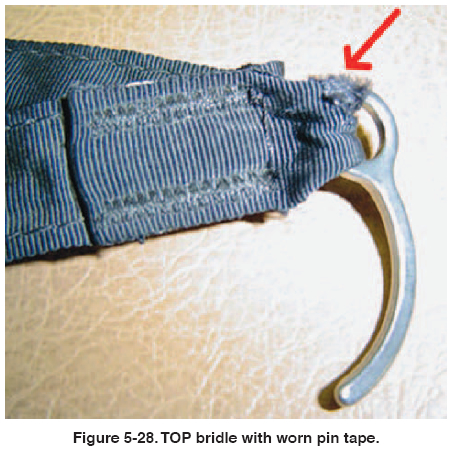
b. For throw-out pilot chutes, inspect the pilot chute fabric
and mesh for holes. Check the TOP handle at the
top of the pilot chute for security, paying special attention
to the tape holding the handle, which is particularly
prone to wear. Check the bridle attachment to the
pilot chute. If it is of a centerline collapsible design,
check the centerline for wear and stretch, and make
sure the length of the bridle is correct. Check the
curved locking pin for wear or damage as well as the
tape, which attaches it to the bridle. [Figure 5-28 on
page 5-16] Check the pilot chute pocket for fit and
wear. Most of today’s installations are what is known
as a “bottom of container” (BOC) configuration. It is
particularly important that the elastic material from
which the pocket is made is in good condition. A
loose pocket can result in a premature deployment of
the main parachute.
c. If repacking a pull-out parachute, check the pilot
chute and bridle in the same manner of the throw-out
parachute inspection. Check the lanyard and handle
for wear.
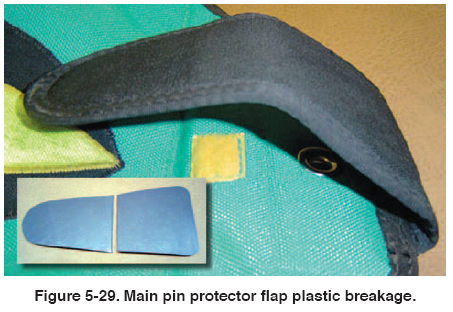
5. If Velcro® is used on the main riser covers, be sure to
check its condition. If plastic, check for breakage and
deformation. If the plastic is excessively deformed, it is
a sign that the covers do not fit properly and may open
prematurely, causing problems.
6. For the container-closing loop, the same criteria applies
as in the pilot emergency parachute. In addition, make
sure the loop material is the same as specified in the
owner’s manual, especially if an AAD is installed. With
certain AADs, a particular type of knot and washer to be
used is specified as well.
| 
