Chapter 5
ROUND CANOPIES AND PILOT EMERGENCY SYSTEMS
The first thing the rigger should check is the continuity of
the canopy to make sure it is straight. Do so by laying the system on the table as if the wearer were lying face down,
head toward the canopy. (On some models, such as military
seat parachutes, it may be face down with the feet
towards the canopy.) Make sure to follow the manufacturer’s
instructions. Ensure that the canopy is right side
out (i.e., the data panel faces out) and the gore numbers
are readable on the outside. Attach the required tension
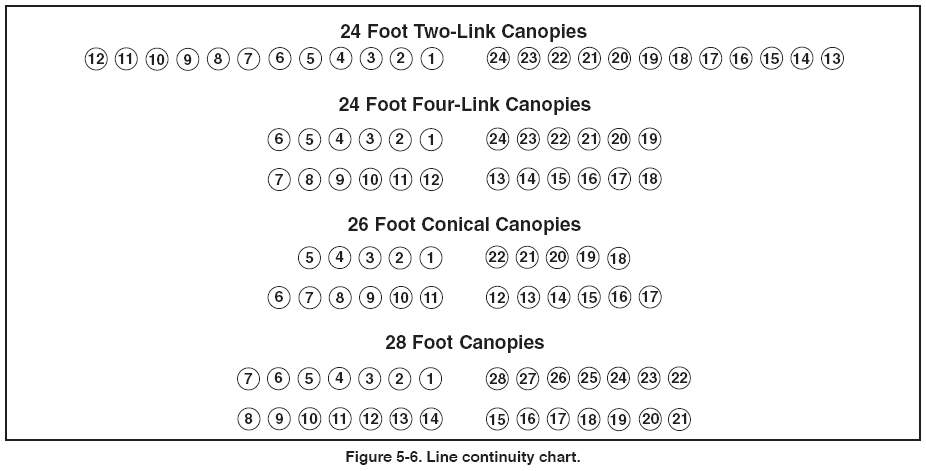
devices and apply light tension. Standing at the canopy,
split the riser line groups and grasp the two gores that separate
them. The top panel should have line number 1 and
the last line of the sequence depending on the number of
lines on the canopy. Starting with number 1, the lines will
run in sequence counterclockwise around the canopy.
(See figure 5-6 for typical line sequences.) The four lines
attached to these two gores comprise the standard “fourline
check” for a round canopy. By running these four
lines from the canopy to the connector links, the rigger
can make a quick check of straightness. If the rigger was
the last person to pack the parachute, he/she may feel this
is sufficient to ensure continuity. However, most riggers
do a full check of all the lines, even on their own pack
jobs.
| 
