Chapter 5
DAMAGE IDENTIFICATION
During the inspection process, the rigger may identify
various discrepancies in the materials and/or the assemblies.
While the following inspection processes call out
what to look for, the specific descriptions and treatment
of the damage are provided in Chapter 7—Repairs,
Alterations, and Manufacture.
PILOT CHUTE AND BRIDLE
1. Check the spring shape and tension; it should not have
an excessive bend to the length of the spring. There
should be no kinks in the wire or sharp edges or burrs.
The swages should be smooth and tight. Check the tension
of the spring against the manufacturer’s specifications.
Most current springs have between 20-30 pounds
of tension, but some run as high as 40-45 pounds. Too
strong a string is rarely an issue, but too weak often is a
problem. Some manufacturers specify a testing method
and frequency of testing.
2. Check the canopy cap for security to the canopy portion
along the stitching and seams. If it has a grommet in
the cap or an alignment strap, check the grommets for
tightness and smooth edges on the inside. Sharp edges
can cut the locking loop. Check the alignment strap for
centering and tacking.
3. Check the canopy fabric for any holes, burns, stains, or
other damage. Check the seams for loose stitching and
look over the mesh portion, if used. Small holes may be
allowed, but consult the manufacturer’s manual. Check
the attachment loop at the base of the pilot chute for security.
Check any hand tacking, if used, to secure the spring
to the base of the pilot chute.
4. If the parachute uses a sewn-on bridle, check the stitching.
If it is a tied-on model, check the knots and any hand
tacking called out in the instructions. Be sure to check the
length against the parts list. Make sure the canopy end of
the bridle is looped around the apex lines and not around
a tension loop. If a floating loop is called out, make sure
the locator tacking is secure.
RESERVE CANOPY
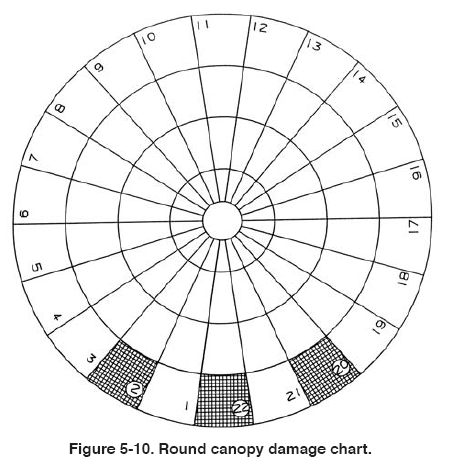
If available, use a canopy damage chart appropriate to
the canopy for documenting your inspection for repair of
any damage found. Figure 5-10 shows a typical chart for
round canopies.
1. Check the apex lines for damage and continuity as well
as the upper lateral band. If there is a tension loop, make
sure it is secure. If there is a vent collar ring, check the
elasticity of the material.
2. Inspect gores and panel fabrics by starting at the top
center gore of the canopy, working your way up one gore
while inspecting the fabric, seams, tapes, and lines. When
you reach the apex, pull the next radial seam toward you,
stretching out the fabric, and work your way down the
gore to the lower lateral band. [Figure 5-11 on page 5-8]
This method is the most efficient use of your time and
physical efforts. Work your way around the canopy,
inspecting each gore from top to bottom.

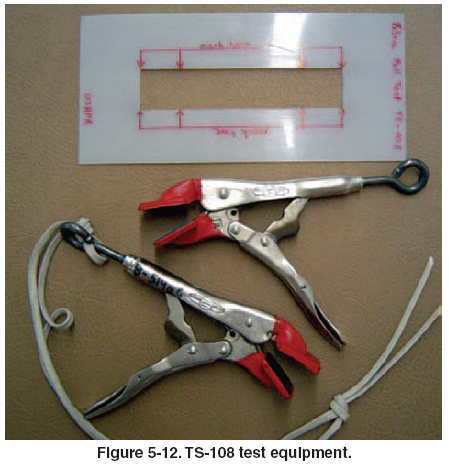
3. The manufacturer may call for the tensile testing of the
fabric after inspection of the canopy for obvious visual
damage. This is very important because there was a fabric
deterioration problem with certain parachutes several
years ago. An AD was issued, and while the exact cause
was never determined, a side benefit was the development
and adoption of a non-destructive fabric pull test method.
This method was adopted by the Parachute Industry
Association (PIA) as Technical Standard TS-108,
Parachute Canopy Fabric Pull Test, Non-Destructive
Method. This method of testing canopy fabric for strength
has been adopted by several canopy manufacturers as
suitable for testing their canopies. However, the rigger
must be careful in using this test method. The proper
equipment is essential for accurate testing and the type of
material must be known in order to test to the correct
strength. The testing equipment is shown in figure 5-12.
The full standard can be found in Appendix I of this handbook.
4. Along with the pull test, the AD also requires testing
the canopy mesh with a solution of Bromo Cresol Green
indicator to determine the presence of an acid condition.
The Bromo Cresol Green indicator is a dark blue liquid
in its standard state. It turns yellow when it contacts
acid—the stronger the acid, the brighter the yellow. If the
test is positive, the canopy will need to be treated to neutralize
the condition. The AD highlights the manufacturer’s
service bulletin as to how to comply with this test
and procedure.
5. If the canopy has a deployment device such as a diaper,
check that it is securely attached, particularly after use.
Check the grommets, line stow bands, elastics, or other
line stow devices. Pay particular attention to where the
stitching attaches to the canopy fabric. This area can be
particularly prone to damage during opening.
| 
