Chapter 5
HARNESS
1. Starting at the riser end, check the webbing for any
wear or damage and inspect the stitching at the riser ends.
If the canopy has steering lines and a guide ring on the
riser, make sure the ring is secure and the steering line is
attached to the steering toggle correctly. With a round
canopy, make sure the steering line has sufficient slack in
it when under tension. If the line is too tight, it can fail at
opening because of too much stretch.

2. Continue down the risers. If canopy releases are
installed, check their operation. With the Capewell cable
release, open the release and make sure there is no dirt or
sand in the mechanism. Also, check for wear, particularly
on the cable ring.
3. Check all of the harness webbing for wear both from
chafing, abrasion, and sunlight degradation. Pay particular
attention to the buffer and chafing strips where used
to prevent wear from the hardware. These buffers are
there to provide early warning before the load bearing
webbing starts to wear. Check the elastic keepers so the
running ends of the straps can be properly stowed.
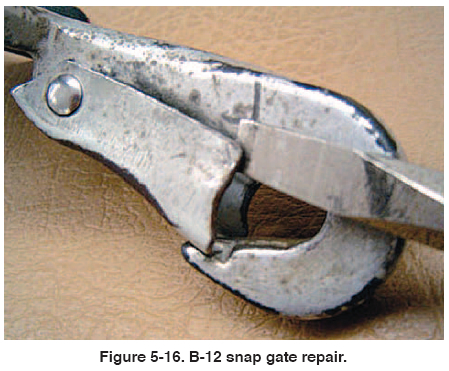
4. Check all of the hardware, paying particular attention
to the leg snaps. Quick ejectors are particularly prone to
failure of the springs. Obviously, those with broken
springs should be replaced. B-12 snaps are prone to having
the gate sides bent to the point they will not close
properly. This gate may be repaired with a screwdriver
and pliers. [Figure 5-16] Straightening the side of the gate
allows the snap to close properly.
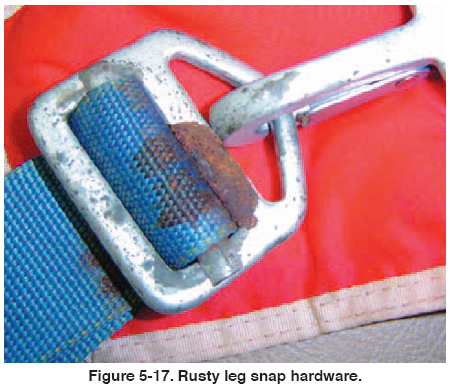
5. An area of concern for many riggers, one for which
there is not much guidance, is how much plating wear and
associated corrosion of the hardware is allowable. This
depends on the location of the damage. If it is a solid ring
or buckle, and the damage has occurred from dragging or
abrasion in an area that is not in contact with webbing,
one solution is to clean the rust with a fine emery cloth
and cover it with clear nail polish. This keeps the area
from continued rusting. It will not, however, prevent further
damage caused by the original rusting. If the rusting
is caused by two pieces of hardware interacting with each
other, the problem is more serious. If allowed to continue, the rust pattern may cause the two pieces to fuse together
under the most severe conditions. In this case, the hardware
must be removed and replaced. If the hardware in
contact with webbing, such as a leg strap adapter,
becomes corroded, it must be replaced. This problem frequently
arises when the parachute is exposed to salt water
and not properly rinsed. The hardware will rust inside the
leg strap webbing causing accelerated wear and must definitely
be replaced. [Figure 5-17]
6. The ripcord housing and pocket should be checked for
wear and fit of the ripcord. On the housing, check the ends
and the ferrules. On more modern assemblies, these ferrules
are brass and more susceptible to wear than the MILSPEC
types. Look inside to make sure there are no
obstructions to interfere with the ripcord. The ripcord
pocket may be elastic, Velcro®, or a military style with a
spring to hold in the ripcord. Whichever type, make sure
the ripcord is held securely, yet at the same time make sure
it is not too tight so the ripcord can be removed easily.
Also, check the tackings that hold the housing and pocket.
| 
