![]()
|
|
||
CHAPTER 4—Seaplane Operations – Preflight and Takeoffs
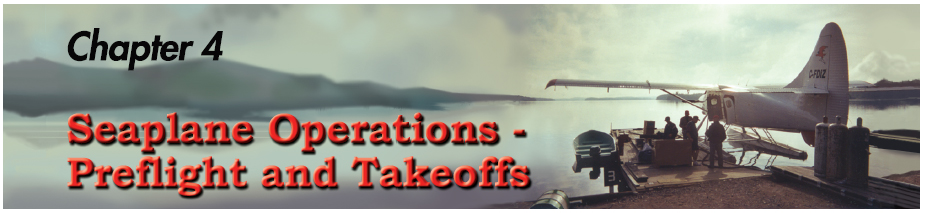
PREFLIGHT INSPECTION Begin the preflight inspection with a thorough review of the existing local weather, destination weather, and water conditions. This weather evaluation should include the direction and speed of the wind to determine their effects on takeoffs, landings, and other water operations. The preflight inspection of a seaplane is somewhat different from that of a landplane. Inspecting a seaplane on the water is complicated by the need to reposition the seaplane to gain access to all parts of the airframe. On the other hand, preflighting a seaplane on land may create certain challenges because the wings and tail surfaces may be out of reach and difficult to inspect when standing on the ground. The following preflight description omits many items that are identical in landplanes and seaplanes in order to emphasize the differences between the two procedures. The process and the equipment to be checked vary from airplane to airplane, but the following description provides a general idea of the preflight inspection for a typical high wing, single-engine floatplane. As always, follow the procedures recommended in the Airplane Flight Manual (AFM) or Pilot’s Operating Handbook (POH). If the seaplane is in the water during the preflight, take a good look at how it sits on the surface. This can provide vital clues to the presence of water in the floats, as well as to the position of the center of gravity. Is the seaplane lower in the water than it should be, given its load? Is one wing lower than the other, or is one float riding noticeably lower in the water than the other? Are the sterns of the floats low in the water? If any of these signs are present, suspect a flooded float compartment or an improperly loaded seaplane. At more than 8 pounds per gallon, even a relatively small amount of water in a float compartment can seriously affect both useful load and center of gravity (CG). In the cockpit, verify that the throttle is closed, the mixture control is full lean, and the magnetos and master switch are turned off. Lower the water rudders and check for any stiffness or binding in the action of the cables. Check that necessary marine and safety equipment, such as life vests, lines (ropes), anchors, and paddles are present, in good condition, and stowed correctly. Obtain the bilge pump and fuel sample cup. Standing on the front of the float, inspect the propeller, forward fuselage, and wing. Check the usual items, working from the nose toward the tail. Water spray damage to the propeller looks similar to gravel damage, and must be corrected by a mechanic. Check the oil and fuel levels and sample the fuel, ensuring that it is the proper grade and free of contaminants. Naturally, the most likely contaminant in seaplane fuel tanks is water. Pay extra attention to the lubrication of all hinges. Not only does lubrication make movement easier, but a good coating of the proper lubricant keeps water out and prevents corrosion. Look for any blistering or bubbling of the paint, which may indicate corrosion of the metal underneath. Check the security of the float struts and their attachment fittings. Be careful moving along the float, and pay attention to wing struts, mooring lines, and other obstacles. If the seaplane is on land, do not stand on the floats aft of the step or the seaplane may tip back. Next, inspect the float itself. Water forces can create very high loads and lead to cumulative damage. Look carefully for signs of stress, such as distortion or buckling of the skin, dents, or loose rivets. The chines should form a continuous smooth curve from front to back, and there should be no bends or kinks along the flange. If the floats are made of fiberglass or composite materials, look carefully for surface cracks, abrasions, or signs of delamination. Check the spreader bars between the floats, and look at the bracing wires and their fittings. Any sign of movement, loose fasteners, broken welds, or a bracing wire that is noticeably tighter or looser than the others is cause for concern. Check for signs of corrosion, especially if the seaplane has been operated in salt water. Although corrosion is less of an issue with composite floats, be sure to check metal fittings and fasteners. [Figure 4-1]
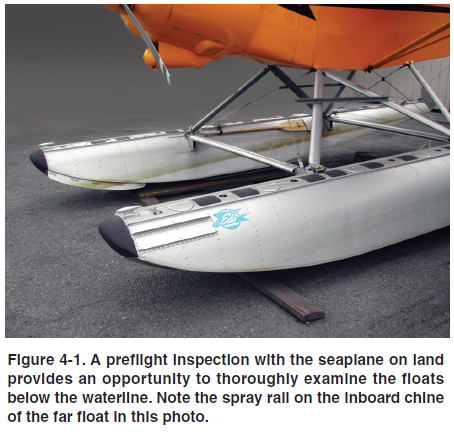
Use the bilge pump to remove any accumulated water from each watertight compartment. The high dynamic water pressure and the physical stresses of takeoffs and landings can momentarily open tiny gaps between float components, allowing small amounts of water to enter. Conversely, sitting idle in the water also results in a small amount of seepage and condensation. While it is normal to pump a modest amount of water from each compartment, more than a quart or so may indicate a problem that should be checked by a qualified aircraft mechanic experienced in working on floats. Normal is a relative term, and experience will indicate how much water is too much. [Figure 4-2]
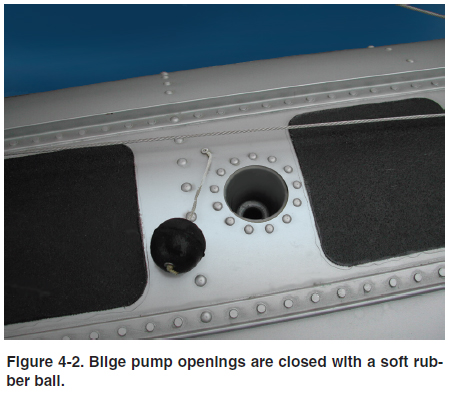
If pumping does not remove any water from a compartment, the tube running from the bilge pump opening to the bottom of the compartment may be damaged or loose. If this is the case, there could be a significant amount of water in the compartment, but the pump is unable to pull it up. [Figure 4-3] Be sure to replace the plugs firmly in each bilge pump opening.
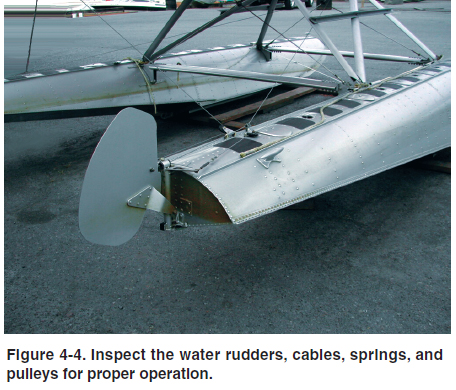
At the stern of the float, check the aft bulkhead, or transom. This area is susceptible to damage from the water rudder moving beyond its normal range of travel. Carefully check the skin for any pinholes or signs of damage from contact with the water rudder or hinge hardware. Inspect the water rudder retraction and steering mechanism and look over the water rudder for any damage. Remove any water weeds or other debris lodged in the water rudder assembly. Check the water rudder cables that run from the float to the fuselage. [Figure 4-4]
To check the empennage area, untie the seaplane, gently push it away from the dock, and turn it 90° so the tail extends over the dock. Take care not to let the water rudders contact the dock. In addition to the normal empennage inspection, check the cables that connect the water rudders to the air rudder. With the air rudder centered, look at the back of the floats to see that the water rudders are also centered. (On some systems, retracting the water rudders disengages them from the air rudder.) If the seaplane has a ventral fin to improve directional stability, this is the time to check it. Spray frequently douses the rear portion of the seaplane, so be particularly alert for signs of corrosion in this area. With the empennage inspection complete, continue turning the seaplane to bring the other float against the dock, and tie it to the dock. Inspect the fuselage, wing, and float on this side. If the seaplane has a door on only one side, turn the seaplane so the door is adjacent to the dock when the inspection is complete. When air temperatures drop toward freezing, ice becomes a matter for concern. Inspect the float compartments and water rudders for ice, and consider the possibility of airframe icing during takeoff due to freezing spray. Water expands as it freezes, and this expansion can cause serious damage to floats. A large amount of water expanding inside a float could cause seams to burst, but even a tiny amount of water freezing and expanding inside a seam can cause severe leakage problems. Many operators who remove their floats for the winter store them upside down with the compartment covers off to allow thorough drainage. When the time comes to reinstall the floats, it’s a good idea to look for any bugs or small animals that might have made a home in the floats. |
| ©AvStop Online Magazine Contact Us Return To Books |